








All topics
On this page
An automation is a rule with three blocks. If starts the rule, And only if holds it back while a second register does not match, and Then says what the portal does. The portal checks the rule every time the gateway of the trigger sends readings. If the gateway is offline, the portal does not check the rule.
What you need
- The role Owner, Admin or Technician in your organisation.
- A gateway with a Modbus device that returns values. See Add Modbus devices.
- For a write action, a register with Lezen + schrijven (read and write) and control turned on for that gateway. See Control registers from the portal.
- For a webhook action, a webhook in your organisation. See Set up a webhook.
Create a rule
Loading the walkthrough.
Open automations
Open Automations in the menu.
Start a new rule
Click New rule. The page New automation rule opens.
Choose a blank rule
Click Blank rule. The rule form opens.
Enter the name
At the top, enter the name of the rule, for example Pump off on overpressure. Without a name, the portal does not save the rule.
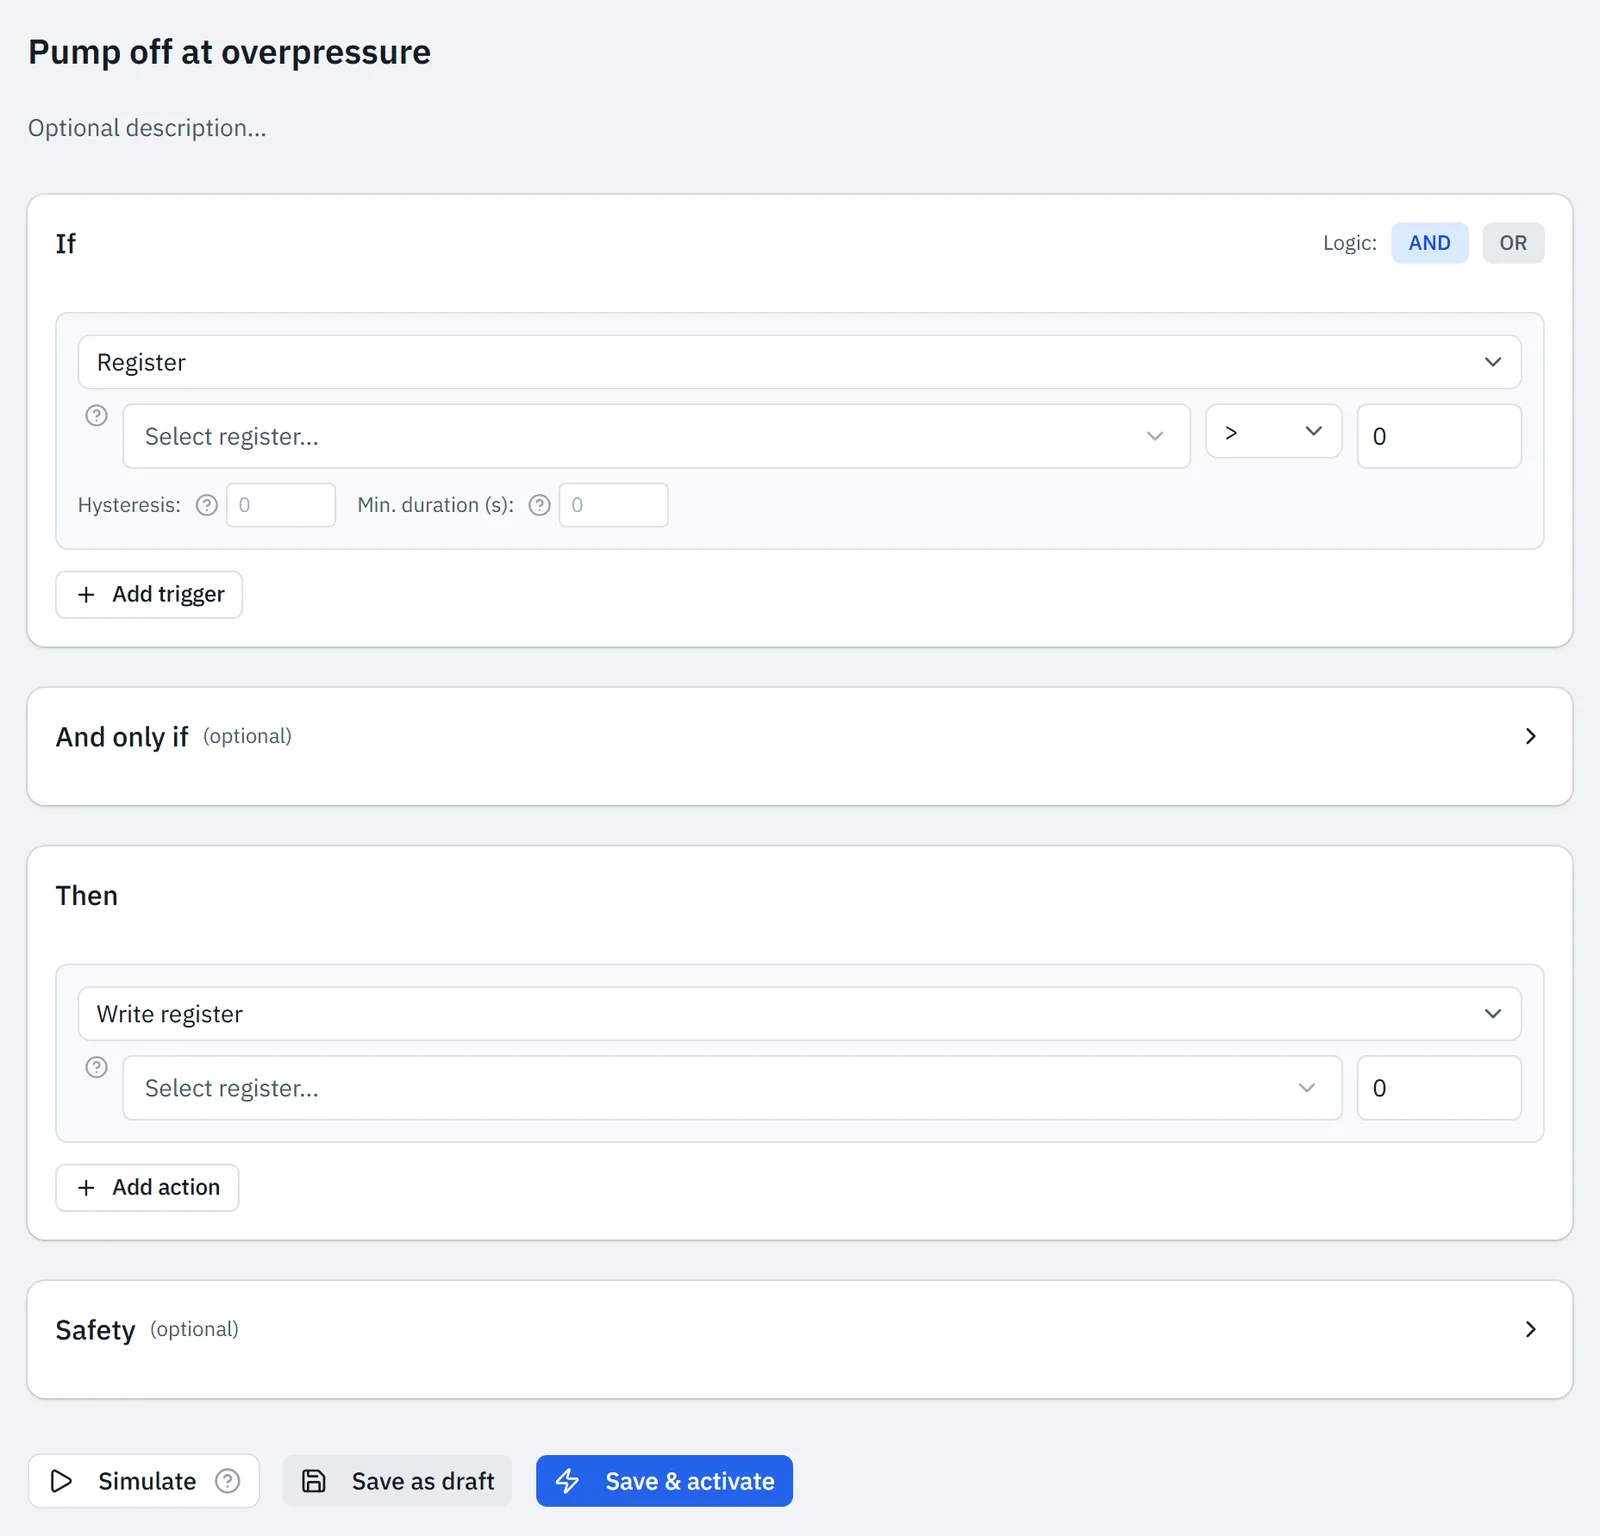
If you want to start from a template, such as Vorstbescherming (frost protection), click Use on that template instead of Blank rule. The template already fills in the name, the trigger, the action, the cooldown and the maximum per hour. You choose the register yourself afterwards, as described below.
Set the trigger
Under If you find the register that starts the rule. Leave the type on Register. Only a register trigger links the rule to a gateway, and the portal checks the rule against the readings of that gateway. How often that happens is described in Choose the polling interval.
Open the register picker
Under If, click Select register....
Choose the gateway
Choose the gateway. The list then shows the Modbus devices of that gateway.
Choose the Modbus device
Choose the Modbus device.
Choose the register
Choose the register. The latest value appears next to each register.
Choose the comparison
Next to the register, choose the comparison, for example >.
Enter the limit
In the field to the right of the comparison, enter the limit, for example
6. The field starts at0.
The table shows when a register trigger matches.
| Comparison | The trigger matches when the value |
|---|---|
| > or < | is above or below the limit |
| >= or <= | is above or below the limit, or equal to it |
| = or ≠ | is equal to the limit, or differs from it |
| between | lies between the limit and the value in Until, both limits included |
| changes | differs from the previous check of the rule |
Enter every value in a rule as the portal shows it, with the scale already applied. With Add trigger you add a second register. Then choose AND in Logic if all triggers must match, or OR if one is enough.
Add a condition
A condition lets the rule fire only if a second register also matches. For example, the pump only switches off on overpressure if the level in the tank is also above a limit.
Open the block
Click And only if. The block expands.
Add the condition
Click Add condition. A condition of the type Time window appears.
Choose the type
In that condition, choose the type Register.
Set the register and limit
Choose the register, the comparison and the limit as for the trigger. Use a comparison with one limit here, such as < or =.
If there are more conditions, choose in Logic whether all of them must match (AND) or only one (OR).
Choose an action
Under Then you find what the portal does as soon as the triggers and conditions match. With Add action you add another action, and the portal runs them one after the other.
The table shows what each action does.
| Action | What the portal does |
|---|---|
| Write register | Writes the value you entered to the chosen register. The list shows only registers with Lezen + schrijven (read and write) |
| Webhook | Sends the event automation.triggered with the ID and the name of the rule to your webhooks |
| Emails the name and the description of the rule with the time to the Default email addresses of the organisation |
Choose the action
Under Then, leave the type on Write register.
Choose the register
Choose the register with Select register..., as for the trigger.
Enter the value
In the field to the right of the register, enter the value that the gateway writes, for example
0to switch the pump off.
You set the address of a webhook in Settings > Webhooks. The portal does not use an address that you enter in the action itself. The message goes to every webhook where Automation with webhook action or All events is selected. See Set up a webhook.
How to set the default addresses is described in Choose who receives alert emails. A team member who turns off the email for Automation executed under My notification preferences does not receive it. If you only want a message at a limit, create an alert rule. You acknowledge an alert and then resolve it in the portal. See Create an alert rule.
Set the cooldown and maximum per hour
A rule does not fire once when the value passes the limit. It fires at every check where the triggers and conditions match. The fields under Safety decide how often the actions then run. Click Safety to open the block.
The table shows the fields with the value of a blank rule.
| Field | Default | What the field does |
|---|---|---|
| Cooldown (seconds) | 60 | The minimum time between two executions of the rule |
| Max per hour | 10 | The highest number of executions per hour |
| Priority (1=highest, 10=lowest) | 5 | The order when several rules react to the same reading |
With the default values, a rule with an email sends up to 10 emails per hour as long as the trigger matches. For an email, therefore, choose a longer cooldown, for example with the button 10 min. Regardless of these fields, the portal runs a single rule at most 10 times per minute and 100 times per hour.
Save and check the rule
Save the rule
Click Save & activate. The page of the rule opens with Active next to the name.
View the executions
Open the tab History. Every execution appears there with Timestamp and Result.
If you do not want the rule to run yet, click Save as draft. The rule then has the status Disabled. Turn it on later with the switch at the top right of the page of the rule, or in the column Status of the list under Automations. Change a rule with Edit on the page of the rule.
Updated on 7 October 2026
Still stuck?
Email or call us. Include the serial number of the gateway, so we can take a look straight away.
Go to support