








All topics
On this page
You do not need to know the baud rate, parity, stop bits or slave address in advance. The app tries only the most common values. If it finds nothing, enter them yourself from the manual.
What you need
- ModbusCloud Diagnostics on your laptop, installed as described in Install ModbusCloud Diagnostics.
- For Modbus RTU, a USB-RS485 adapter and three wires for A, B and GND.
- For Modbus TCP, a laptop in the same network as the Modbus device.
Connect through a USB-RS485 adapter
Through the adapter, your laptop is the master on the RS485 bus. The app searches for the Modbus device as soon as it sees the adapter.
Take the gateway off the bus
If the gateway is already on the same bus, disconnect its A and B wires. Two masters on one bus give garbled answers. While the wires are disconnected, the portal receives no new values from that bus. Reconnect them when you are done.
Connect the wires
Connect A of the adapter to A of the Modbus device, B to B and GND to GND.
Plug in the adapter
Plug the USB-RS485 adapter into your laptop.
Start adding
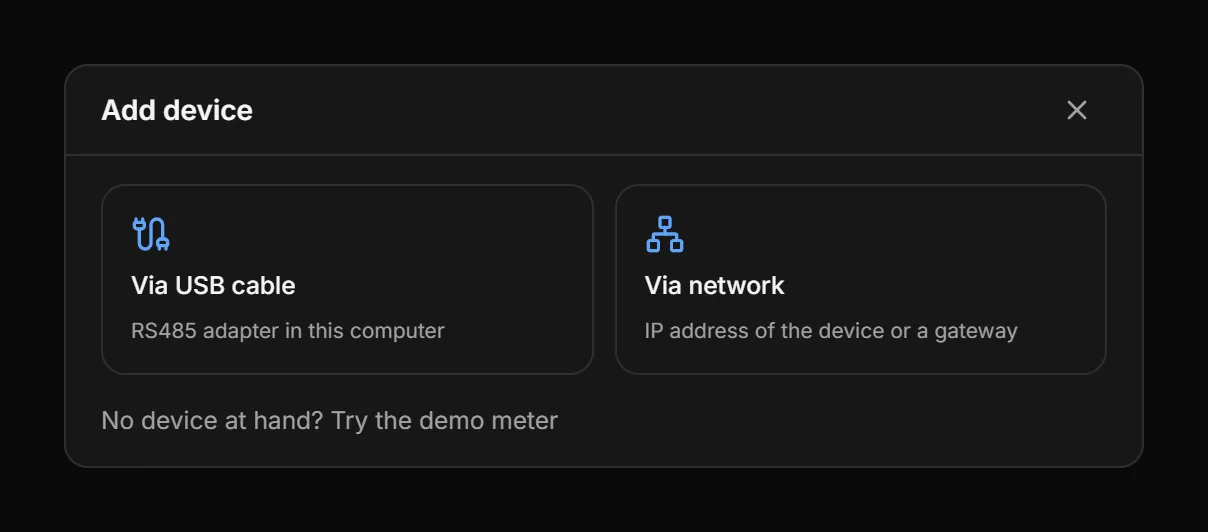
Click Add device in the sidebar.
Choose USB
Choose Via USB cable. If the app stays on Waiting for the adapter…, check that the driver of the adapter works.
Check the port
If the list has more ports, choose the port of the adapter. The search then starts again.
Wait for the result
Wait until the app reports at which address and with which baud rate it found the Modbus device. It then starts identifying.
How identifying continues is described in Identify a Modbus device, read and write values.
Which settings and addresses the app tries
The app tries the 13 most common combinations, all with 8 data bits. The table shows which.
| Parity and stop bits | Baud rate |
|---|---|
| No parity, 1 stop bit (8N1) | 1200, 2400, 4800, 9600, 19200, 38400, 57600, 115200 |
| Even parity, 1 stop bit (8E1) | 9600, 19200 |
| Odd parity, 1 stop bit (8O1) | 9600, 19200 |
| No parity, 2 stop bits (8N2) | 9600 |
For each combination, the app tries the slave addresses 1 to 10, 100, 126, 200 and 247. It stops at the first combination on which an address answers and takes the first address that answered. If the Modbus device uses another setting or another address, or speaks Modbus ASCII, the search does not find it.
Enter the settings yourself if the search finds nothing
If the app finds nothing, it shows the likely cause and a list of checks. If no answer came at all, first swap A and B on one side of the cable. That does no harm. Click Search again after each change. If you know the settings from the manual, enter them yourself.
Choose manual setup
Click Set up manually.
Choose the settings
In Baud rate, Parity and Stop bits, choose the values from the manual.
Enter the address
In Modbus address, enter the slave address, from 1 to 247.
Connect
Click Connect. If the Modbus device does not answer, the app reports No answer with these settings.
If you do not know the slave address, search the whole bus with the network scan. If it stays silent, continue with Find faults with the Diagnostics tab and the console.
Connect over the network
A Modbus TCP device is reached through its IP address. The app finds the unit ID itself.
Start adding
Click Add device in the sidebar.
Choose network
Choose Via network.
Open more options
If the Modbus device does not listen on port
502, or an RS485-to-network converter sits in between, click More options.Enter the port
In Port, enter the port of the Modbus device if it is not
502.Turn on RTU over TCP
If a converter passes the RS485 frames on to the network unchanged, turn on RTU over TCP (transparent gateway).
Enter the IP address
In the field at the top, enter the IP address of the Modbus device, for example
192.168.10.20. If you do not know it, click Search the network and click the Modbus device in the list. The app then connects by itself.Connect
Click Connect. The app tries the unit IDs 1, 255, 0, 126, 100, 3 and 2 and reports at which address the Modbus device answers.
Search the network tries the addresses 1 to 254 with the same first three numbers as the IP address of your laptop, on the set port. If no Modbus answer comes, check that Modbus TCP is turned on in the Modbus device. If the app reports address 0, set a unit ID from 1 to 255 on the Modbus device. The portal does not accept unit ID 0.
Find more Modbus devices on the same bus
If a Modbus device on the bus is already connected in the app, the app searches for the others at every slave address from 1 to 247. It uses the same settings.
Start adding
Click Add device in the sidebar.
Choose USB
Choose Via USB cable. The app reports that the port is already in use.
Search the bus
Click Search the same bus. The app shows every other slave address that answers.
Add the address
Click Add at the slave address you are looking for. The app starts identifying.
If the app finds no other address, the new Modbus device may use other settings. Connect it alone and click Disconnect and try all settings. The app disconnects the Modbus devices on that port and searches again with the combinations from the table.
Search a bus or IP range with the network scan
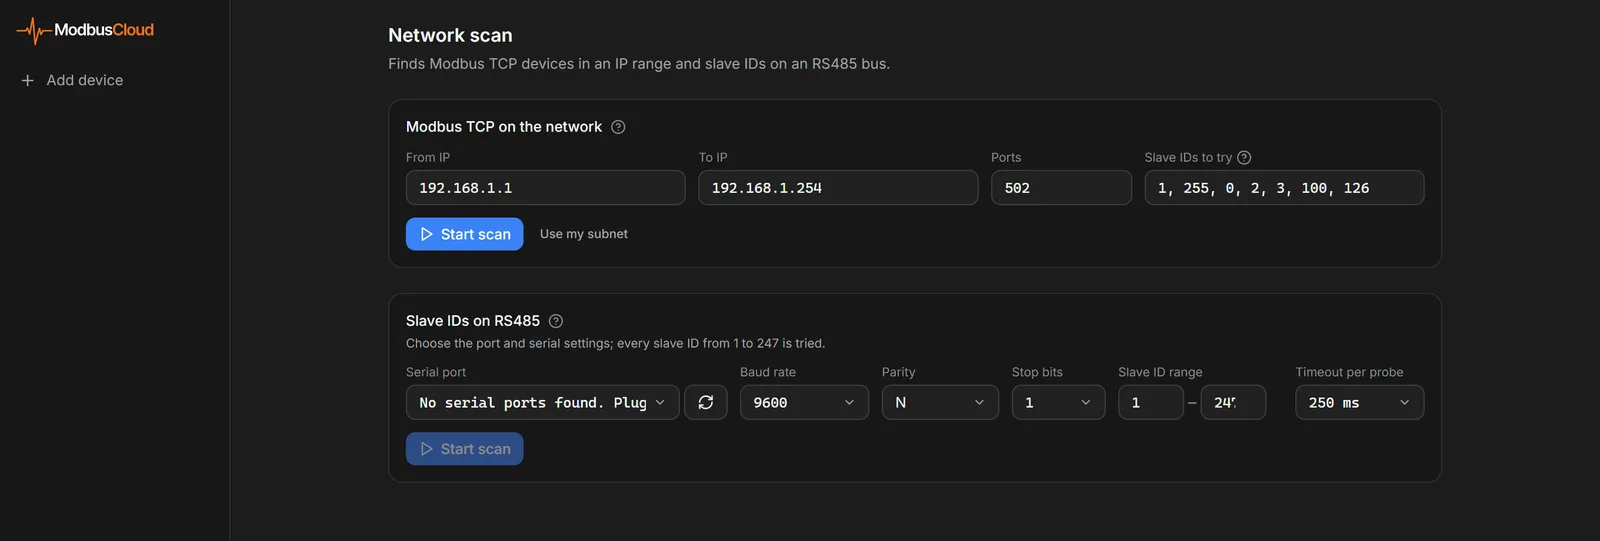
The Network scan page searches an IP range for Modbus TCP devices, or an RS485 bus at the slave addresses 1 to 247 with settings that you choose yourself. Use it when the normal search does not try an address, port or unit ID.
Start adding
Click Add device in the sidebar.
Choose network
Choose Via network.
Open the network scan
Click Search another IP range. The Network scan page opens.
Fill in the fields
Fill in the fields of Modbus TCP on the network or of Slave IDs on RS485.
Start the scan
Click Start scan in the same block. A bar shows the progress.
Add the Modbus device
Click Add at the Modbus device you are looking for. The Add device window opens with the details filled in and the app starts identifying.
The table shows the fields per block and what they contain by default.
| Block | Fields | Default |
|---|---|---|
| Modbus TCP on the network | From IP, To IP, Ports, Slave IDs to try | Address 1-254 in the network of your laptop, port 502, unit ID 1, 255, 0, 2, 3, 100 and 126 |
| Slave IDs on RS485 | Serial port, Baud rate, Parity, Stop bits, Slave ID range, Timeout per probe | 9600 baud, no parity, 1 stop bit, slave address 1-247, 250 ms per probe |
Separate more ports or unit IDs with a comma. If a result shows Port open, no Modbus answer, something listens on that port that did not answer as a Modbus TCP device. What to watch for during a scan, such as duplicate addresses, you can read in the knowledge base under scanning a Modbus network.
Search with the gateway or with the laptop
The gateway can also search by itself, on its RS485 bus and in its own subnet. You start that in the portal with the tile Automatic search under Add Modbus device.
| Feature | Automatic search in the portal | Diagnostics on your laptop |
|---|---|---|
| Modbus TCP port | Only 502 | Any port you enter |
| Condition | The gateway is online and reports that it can search. Role Owner, Admin or Technician | No account needed |
| Result | After Add, the Modbus device is listed under the gateway in the portal | Address and settings that you enter in the portal yourself |
The laptop is the route if the gateway is not installed yet or not online, or if the tile is missing. That also applies to a Modbus TCP device that does not listen on port 502. More about the search by the gateway is in Find Modbus devices with automatic search and Automatic search does not find everything.
What the laptop finds, you enter in the portal as described in Set the address and connection of a Modbus device. All Modbus RTU devices on the bus of the gateway must have the same baud rate, parity and stop bits. The wiring to the gateway is described in Connect the RS485 bus.
Updated on 7 October 2026
Still stuck?
Email or call us. Include the serial number of the gateway, so we can take a look straight away.
Go to support