








All topics
On this page
You use a custom template when the Modbus device is not in the library, or when you always want to read the same registers. The template belongs to your organisation and is available on every gateway. If you do not want to enter the registers yourself, ModbusCloud creates a missing template free of charge as soon as the register data is available. How to request it is described in Modbus device is not in the library.
What you need
- The role Owner, Admin or Technician in your organisation. With Read only you can see Templates, but the portal does not save any change.
- The register map from the manual of the Modbus device, with the address, function code and data type of each value. How to read it is covered in the course lesson How to read a Modbus datasheet, step by step.
Create a template
After these steps, Templates contains an empty template with brand, model and protocol. You can also reach Create template through the Custom template tile in the Add Modbus device window.
Open Templates
Open Templates in the menu.
Start creating
Click Create template. The Create template window opens.
Enter the name
If you want a name other than brand and model, enter one in Name. If the field stays empty, the template is named after the brand and model.
Enter the brand
In Brand, enter the manufacturer. The field is required.
Enter the model
In Model, enter the type as it appears on the rating plate. This field is also required.
Choose the protocol
In Protocol, choose Modbus RTU for RS485 or Modbus TCP for the network. Modbus TCP is selected by default. When you add a Modbus device, the portal takes over this protocol.
Enter the category
If you also want to find the template by type when adding a device, enter a type in Category, such as Energy meter.
Add the template
Click Add. The portal shows Template created and the template appears in the list with 0 registers.
Open the template
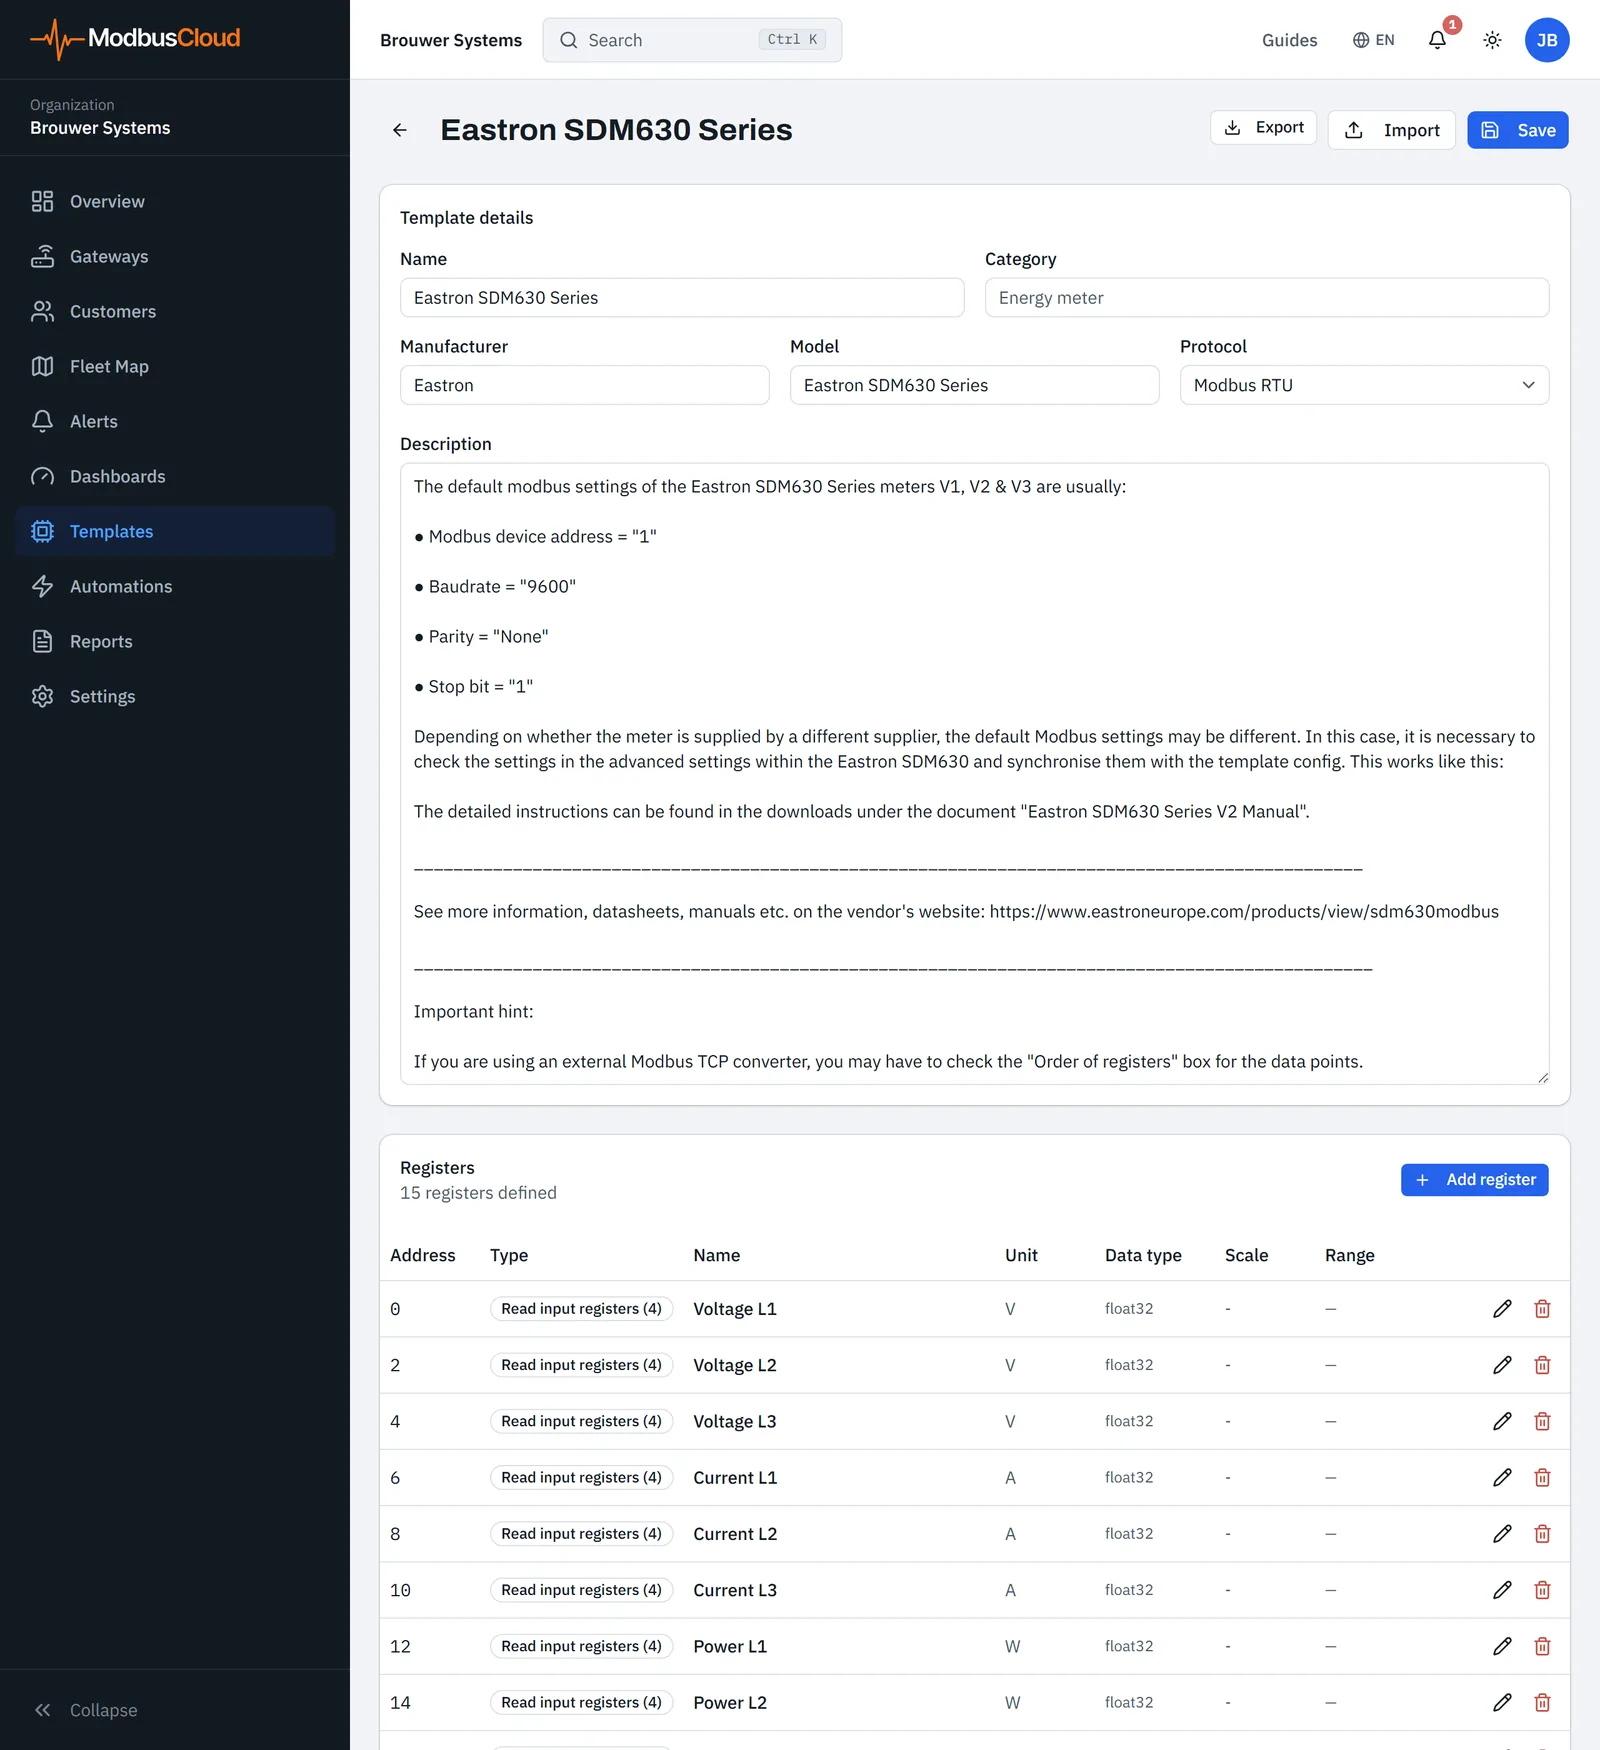
Click the eye at the end of the row, labelled Bekijken / bewerken (view / edit). The page of the template opens.
Add registers
After these steps, the template stores the registers that the gateway will read.
Open the window
Click Add register.
Enter the address
In Address, enter the register address, counted from
0. If the manual gives addresses such as 40001, convert them with Enter a register address from the manual.Choose the function
In Function code, choose the function from the manual, usually Read holding registers (3) or Read input registers (4). Read holding registers (3) is selected by default.
Enter the name
In Name, enter the name of the value, such as Voltage L1. The field is required.
Enter the unit
In Unit, enter the unit, such as
VorkWh.Choose the data type
In Data type, choose the type from the manual. The gateway reads only int16, uint16, int32, uint32 and float32.
Choose the byte order
If the type is int32, uint32 or float32, choose the order from the manual in Byte order. If the manual gives none, or the type is int16 or uint16, leave ABCD (1,2,3,4) selected.
Enter the scale
If the manual gives a factor for the raw value, enter it in Scale (multiply). Otherwise leave
1.Put the register in the list
Click Add. The register appears in the list, sorted by function code and address. Repeat these steps for each register.
Save the template
When all registers are in the list, click Save at the top right. Only then does the portal store the registers and show Template saved.
The window also shows Byte order for int16 and uint16. With BADC (2,1,4,3) or DCBA (4,3,2,1), the gateway reads the two bytes the other way round there. The page of the Modbus device does not show this choice. If a value is wrong later, check the byte order and the scale as described in Set the byte order and scale factor.
Make a register writable
A register that you want to control from the portal, such as a setpoint, gets a write function in the template. In Function code, choose Set single holding register (6) or Set multiple holding registers (16). A Modbus device with this template gets that register as a holding register. The gateway reads it with function code 3 and the portal may write to it. The portal always writes a 32-bit value with function code 16.
With Minimum and Maximum you limit the value that the portal writes. The portal rejects a value outside these limits. Writing works only when control is switched on for the gateway, as described in Control registers from the portal.
Choose the template for a Modbus device
After these steps, the Modbus device has its own copy of the registers from the template. If you reached Templates through the Custom template tile, open the gateway again.
Open the gateway
Open the gateway to which the Modbus device is connected.
Start adding
On the Overview tab, click Add Modbus device.
Choose the library
Choose Library. Your own templates are at the top under Your templates, followed by the number of registers.
Choose the template
Choose your template. If the list is long, search by name, brand, model or category. The Configure Modbus device window opens with the name and protocol from the template.
Enter the address and connection
Enter the address and connection as described in Set the address and connection of a Modbus device.
Add the Modbus device
Click Add. The portal shows how many registers the Modbus device received.
The portal does not take over a register without a name or with an address outside 0 to 65535 when adding. The other registers do come along.
Change a template later
A change to a template applies only to Modbus devices that you add afterwards. Modbus devices that already use the template keep their own registers. You change those on the page of the Modbus device, as described in Set up registers.
Open the template
In Templates, click the eye next to the template (Bekijken / bewerken).
Open the register
Click the pencil next to the register (Edit register).
Adjust the fields
Change the fields that need to change.
Confirm the change
In the window, click Save. The window closes and the list shows the change.
Save the template
Click Save at the top right. Only then does the portal store the change.
You delete a register with the bin next to the register (Delete). The portal asks for no confirmation, but it also stores that change only after Save. You change brand, model and protocol under Template details. The brand is called Manufacturer there.
Export and import a template
A JSON file stores a template outside the portal. You can use it to take a template to another organisation that you are a member of, or to import a register list from ModbusCloud Diagnostics.
On the page of the template, click Export. The browser downloads a JSON file with the details and all registers of the template.
You import a JSON file as follows.
Open the template
Open the template in which you want to import the registers. For a new template, create an empty one first.
Start the import
Click Import.
Choose the file
Choose the JSON file. The portal shows how many registers it imported. If the file is not valid JSON, the portal shows Invalid JSON file.
Save the template
Click Save. Only then does the portal store the imported registers.
The file is a JSON object with the details of the template and a list registers. protocol contains rtu or tcp. This example has two registers.
{
  "name": "Voorbeeld EM-100",
  "brand": "Voorbeeld",
  "model": "EM-100",
  "protocol": "rtu",
  "category": "Energiemeter",
  "registers": [
    { "address": 0, "fc": 4, "name": "Spanning L1", "unit": "V", "scale": 1, "data_type": "float32", "byte_order": "ABCD" },
    { "address": 12, "fc": 4, "name": "Vermogen L1", "unit": "W", "scale": 1, "data_type": "float32", "byte_order": "ABCD" }
  ]
}
The table shows what each field of a register means.
| Field | Meaning | Values |
|---|---|---|
address | Register address, counted from 0 | 0-65535 |
fc | Function code | 3 or 4 to read, 6 or 16 for a writable holding register |
name | Name of the value | Required |
unit | Unit | For example V, kWh or °C |
data_type | Data type | int16, uint16, int32, uint32, float32 |
byte_order | Byte order | ABCD, CDAB, BADC, DCBA |
scale | Factor for the raw value | For example 0.1 |
min_value, max_value | Limits for writing | May be omitted |
access | Make writable | read_write for a writable holding register, may be omitted |
ModbusCloud Diagnostics creates a file with the same structure when you export a device type as ModbusCloud gateway JSON. How that works is described in Log and export with Diagnostics. After Import and before Save, check the Protocol and the data type of each register.
Updated on 7 October 2026
Still stuck?
Email or call us. Include the serial number of the gateway, so we can take a look straight away.
Go to support