








All topics
On this page
The gateway reads a Modbus device at the address and connection stored in the portal. You set the address itself on the Modbus device. If the portal holds a different address, the gateway gets no answer.
What you need
- The Owner, Admin or Technician role. With the Read only role you can see the connection, but you cannot change anything.
- The address set on the Modbus device. For Modbus TCP, also the IP address and the port.
Choose the protocol
If you add a Modbus device through Library, you enter the connection in the Configure Modbus device window. The Protocol field decides how the gateway reaches the Modbus device and which fields the portal shows. The table shows what you enter per protocol.
| Protocol | Connection | Fields |
|---|---|---|
| Modbus RTU | RS485 bus of the gateway | Slave-adres (slave address) |
| Modbus TCP | Network through the LAN or WAN port | IP-adres (IP address), Poort (port), Unit-ID (unit ID) |
The protocol of the chosen template is already filled in. The address field gets the first free address on the gateway. If you add the Modbus device with automatic search, the protocol and address show what the gateway found. The knowledge base helps you decide which protocol suits your installation in Modbus RTU vs Modbus TCP.
Enter the slave address for Modbus RTU
With Modbus RTU, enter a number from 1 to 247 in Slave-adres. Use the address set on the Modbus device. The address of each Modbus device on the bus is covered in Connect the RS485 bus.
Below the address, the portal shows Seriële bus (serial bus) with the bus settings of the gateway, 9600 8N1 by default. They apply to all Modbus RTU devices on the gateway, and every Modbus device on the bus must use the same settings. You change them in Gateway settings under Modbus RTU-bus (Modbus RTU bus), as described in Gateway settings.
Enter the IP address, port and unit ID for Modbus TCP
With Modbus TCP, IP-adres and Poort take the place of Seriële bus, and the address field is called Unit-ID. The table shows what you enter.
| Field | What you enter | Default |
|---|---|---|
| IP-adres | The IP address of the Modbus device, for example 192.168.10.20 | Empty |
| Poort | The TCP port of the Modbus device, 1-65535 | 502 |
| Unit-ID | The unit ID from the settings of the Modbus device, 1-255 | First free address |
Without an IP address, the portal saves the Modbus device but the gateway does not read it. Give the Modbus device a fixed IP address, because the gateway always looks for it at the address stored in the portal. You can find how to connect a Modbus TCP device to the gateway in Connect to the network via WAN and LAN.
Use each address once per gateway
A slave address or unit ID occurs once per gateway. This also applies between a Modbus RTU device and a Modbus TCP device on the same gateway.
Two Modbus TCP devices at different IP addresses each need their own unit ID. The gateway keeps their registers apart by unit ID and register address, not by IP address. If they answer on the same unit ID, set a different unit ID on one of the two. If a Modbus TCP device ignores the unit ID, enter a free unit ID in the portal.
The portal does not support unit ID 0. If a Modbus device answers only on unit ID 0, set a unit ID from 1 to 255 on the Modbus device. The message you get for an address that is taken is covered in Message when adding or saving a Modbus device.
Change the connection afterwards
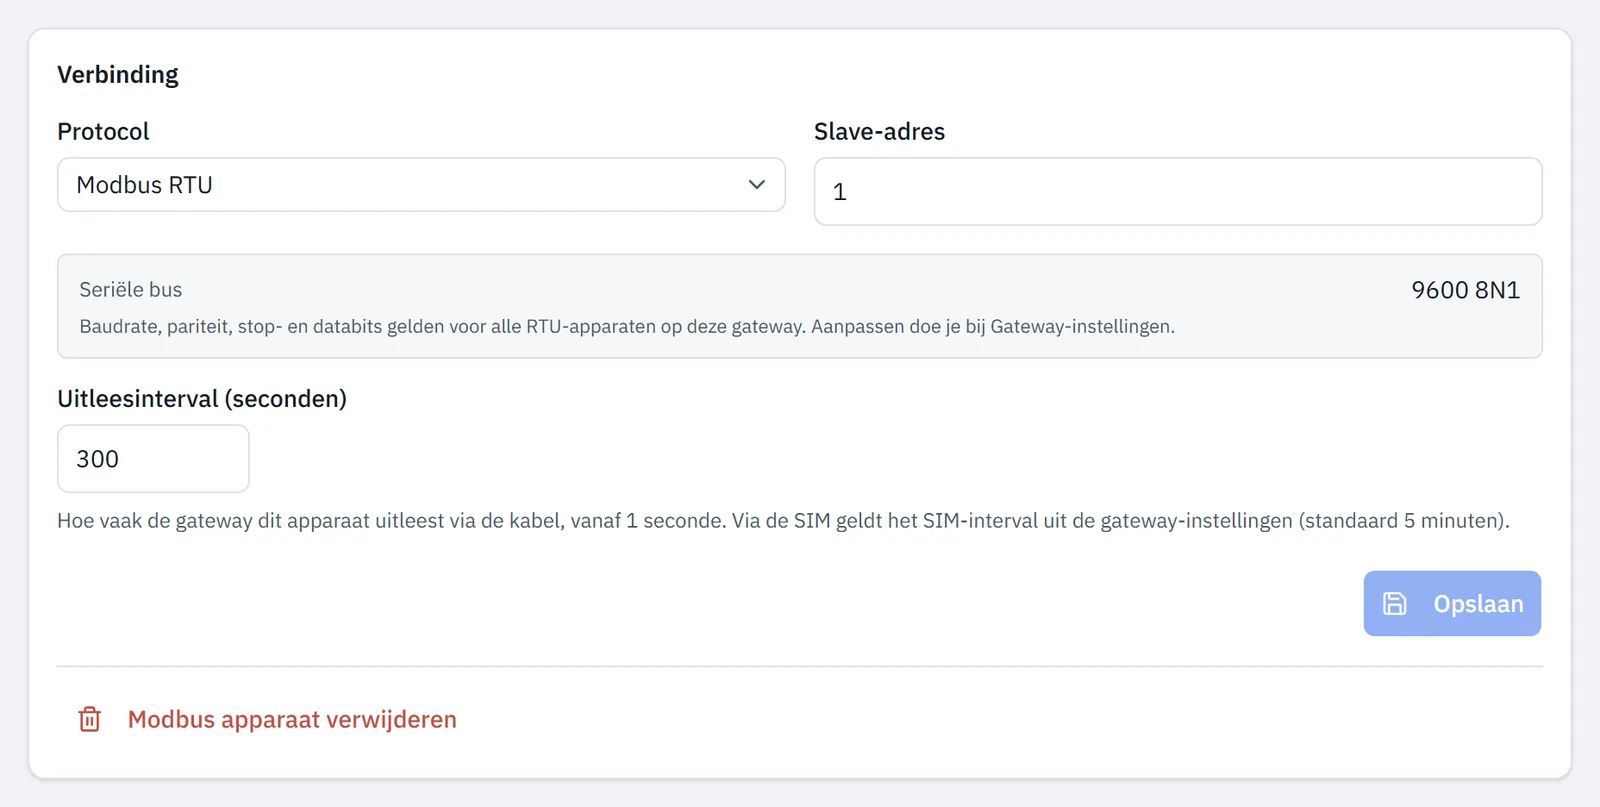
On the page of a Modbus device, you change the protocol, the address and the TCP details under Verbinding (connection). A new address keeps the registers, with their history.
Open the gateway list
Open Gateways in the menu.
Open the gateway
Click the gateway of the Modbus device. The gateway page opens on the Overview tab.
Open the Modbus device
Under Modbus devices, click the card of the Modbus device. The Modbus apparaat (Modbus device) page opens.
Adjust the connection
Under Verbinding, adjust the Protocol, the Slave-adres or Unit-ID, the IP-adres or the Poort.
Save the change
Click Save. The portal shows Opgeslagen en naar de gateway gestuurd (saved and sent to the gateway).
If you changed the address, the page shows Modbus apparaat niet gevonden (Modbus device not found) after saving, because it still looks for the old address. Open the Modbus device again from the gateway page.
If the portal shows only Opgeslagen (saved), with a warning, the configuration could not reach the gateway. What to do then is covered in Message when adding or saving a Modbus device.
The same block holds Uitleesinterval (seconden) (polling interval in seconds). You can find how to choose it in Choose the polling interval. You set the registers above the block as described in Set up registers.
Delete the Modbus device
Deleting removes the Modbus device with its registers and settings from the gateway. The gateway then stops reading it.
A gateway with older software keeps reading the address if you delete its last Modbus device. Those readings do not reach the portal. What the confirmation says in that case is covered in Message when adding or saving a Modbus device.
Open the Modbus device
On the gateway page, under Modbus devices, click the card of the Modbus device.
Start deleting
At the bottom of the page, click Modbus apparaat verwijderen (delete Modbus device). The portal asks for confirmation.
Confirm deleting
Click Bevestigen (confirm). The portal shows Modbus device deleted and opens the gateway page again.
Updated on 7 October 2026
Still stuck?
Email or call us. Include the serial number of the gateway, so we can take a look straight away.
Go to support